Join the journey of a longtime gamer who has put the hobby on hold for over 20 years as he moves from the pure modelling aspect of the game to the actual purpose of playing the game. Content will focus on, but is not limited to, Battlefront's "Flames of War," and whatever else might spark my interest.
Saturday, October 20, 2012
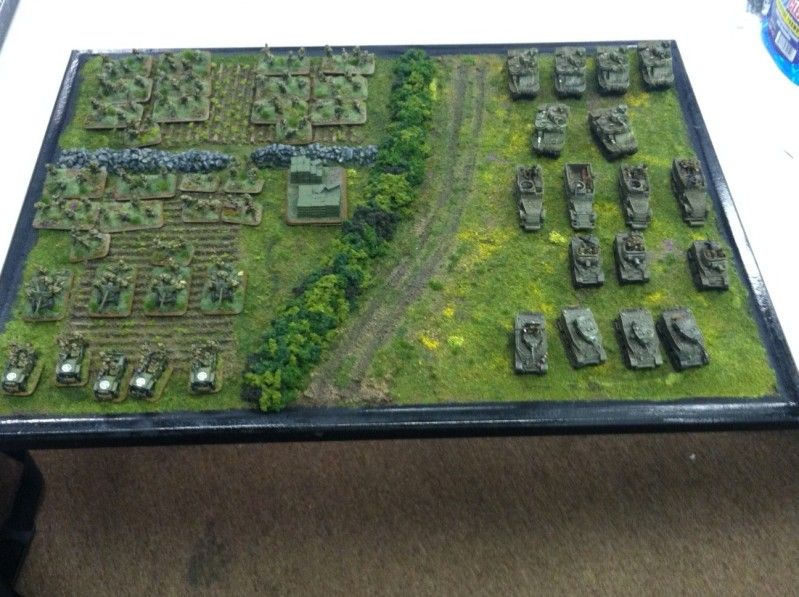
Making a Display Board
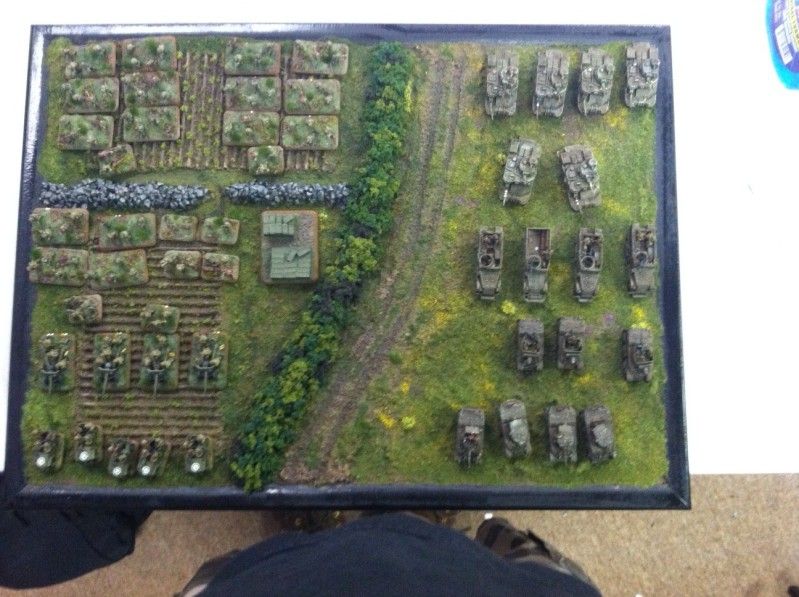
Had a team tourney recently and I need a good carrying board to hold my troops that I was going to use for the tournament....and I needed to make it look good to enhance my troops for the painting competition.
Why did I need the board? The main reason was to speed up play. By having the troops I would need for the tourney out...for the entire tournament...I don't have to keep digging into my carrying case, taking out the foam trays to get to all the troops I would need...slowing down each games' setup. This also saves valuable space in and around the table.
Now, I could have just gone with a simple plastic storage bin lid or something similar...cheap and effective...but not that pretty. Making the board a display board with terrain really makes the unit POP!
So, how to do this…
Materials:
- 17"x 23" Cork Bulletin Board with wood sides
- Spackle
- Corrugated cardboard pieces
- Vallejo Pumice
- Golden Pumice
- Loose Gravel
- Woodland Scenics Fine Flock (different colors)
- Woodland Scenics Coarse Flock (different colors)
- Woodland Scenics Clump Foliage (different colors)
- Woodland Scenics Ballast (very fine/small rocks)
- Silfor tufts (4mm and 6mm)
- Army Painter Meadow Flowers
- Matte Medium/Flock sealant
- Elmer's Glue
- Hot Glue Gun
- Cheap Acrylic Craft Paints (Americana series)
- Spray Can Gloss Varnish
- Spray Can Black Lacquer
- Sandpaper
Step 1 Have a vision
- To make the board look realistic, you have to have a vision. Inspiration can come from many sources...look at pictures, really good game tables with lots of terrain, etc...
- Now, take that overall and pick a section that will fit your board area
- I wanted to have a road with a hedgerow on the side separating the road from some fields that were separated by a stone wall. The other side of the road was to be an open field. This was mainly to allow me to try multiple terrain building techniques I have been waiting to try...Thanks to Sean Morris (The Terrain Guy) for giving me the bug ;-)
Step 2 Have a plan
- You have to have a plan..otherwise you will waste time repeating things as you have to fix areas messed up by doing a step "out of order."
- My advice...build up and out
- Build the lower levels first and build upon that foundation
- Build from the center and then out
- With that vision in mind, break components down into levels and sections to facilitate the "build up and out."
- Write the plan down as a blue print! If you keep it all in your head you are bound to forget something and miss a step and have to repeat steps to add it back in.
- As you build, use models of the appropriate size to make sure your scale is correct. Nothing worse than building a board for 15mm and things are sized too big or too small. That disparity works against you and diminishes the excellence of your paint job you built the board to enhance in the first place.
Step 3 Seal the Board
- I choose a cork board because it was cheap ($5). You could choose a dry erase board but they are more expensive (at least 2-3 times more). If you did choose a dry erase board I would "rough up" the surface first with sandpaper and steel wool to help the materials adhere better then follow the rest of the steps for sealing below.
- You will be dealing with a lot of materials that are wet when you apply them. To make sure the cork and cardboard of the bulletin don't lose their integrity you should protect them from water. Here is where the gloss varnish and black lacquer comes in handy.
- I didn't think the pale wood color of the bulletin board fit the image I wanted to display for the board so I sprayed the edges a nice black lacquer to give it nice look and to set off the terrain in the middle.
- Next spray the entire board (the edges, the front and the back) with gloss varnish. This will give a nice surface for the all the terrain to adhere to and protect the cork from moisture during the build process.
Step 4 Let there be... ground!
- Take your Spackle and spread it out over the board. This is the base ground level from which everything will be built. You can add textures here and there to give the ground "life" and make it look more realistic...you don't want it totally smooth.
- Be careful not to get it on your freshly painted black frame. If you do, simply wipe it away with a damp cloth. The extra gloss varnish you used on the frame helps protect it from little “accidents” like this.
- Now sand the Spackle down to knock down those nasty ripples or "overhang" spikes that tend to form when you add Spackle to the board. Again, you don't want to make it perfectly smooth...leave little raises and dips.
Step 5 On the Road again.....Add the road
- The road I wanted bisects the board, so following the "build up and out" we need to start with the road in the center
- Here I used a mix of the Golden Artist Pumice and Vallejo's White Pumice to get a nice gritty rough goo...spread this out in the shape of the road. The bend in the road is to add a little character.
- Next, to make this look like a road you need to add tire tracks. This road is just a little larger a one lane road and a little smaller than a 2 lane road, so I added 3 paths for the tires (one vehicle gets a little out of the way). To make these just take the end of a paint brush and drag it along the path where the tires would travel. Make sure you take the excess off of the paintbrush as it builds up. Use a model to verify the wide of the tracks. If you are off....just smooth the road back out and do it again.
Step 6 Add the Height
- I said that I wanted some hedges and a wall. To build these and add a little vertical dimension to the board I used Spackle again.
- This time instead of flattening the Spackle out, I left it in a rough mound shape where I wanted the hedge and wall to be placed. This mound will the base where I will add the clump foliage for the hedge and rocks for the stone wall.
Step 7 Add the fields
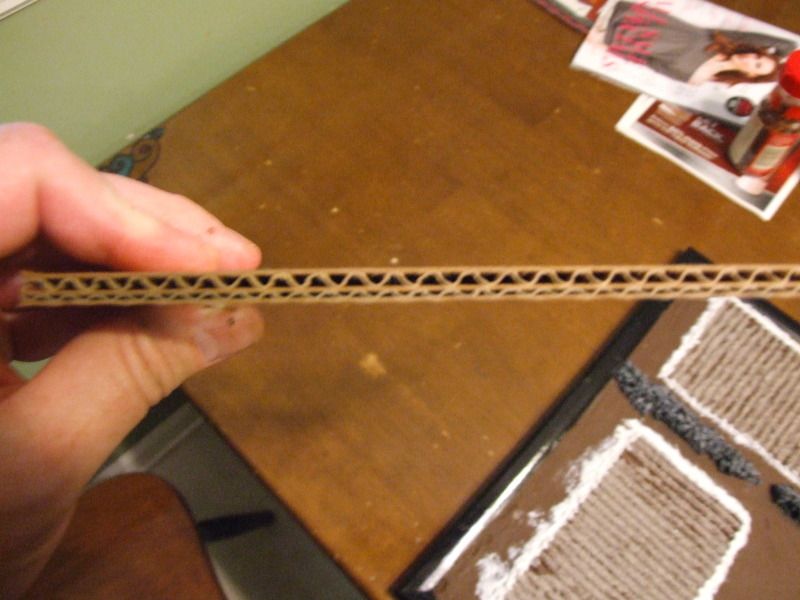
- Plowed fields have nice rows....just like corrugated cardboard.
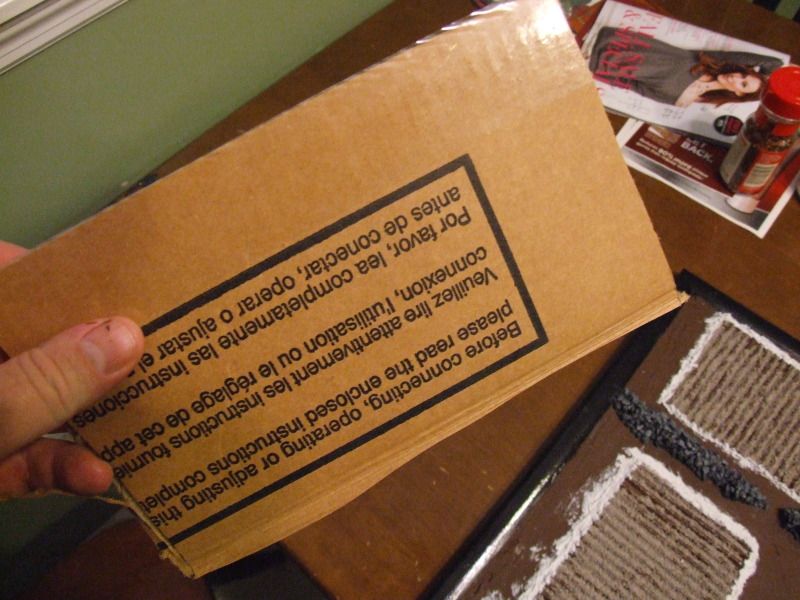
- Cut the cardboard into the shapes you want
- Take your cardboard and CAREFULLY peel one side of the backing off, leaving the nice bumpy rows.
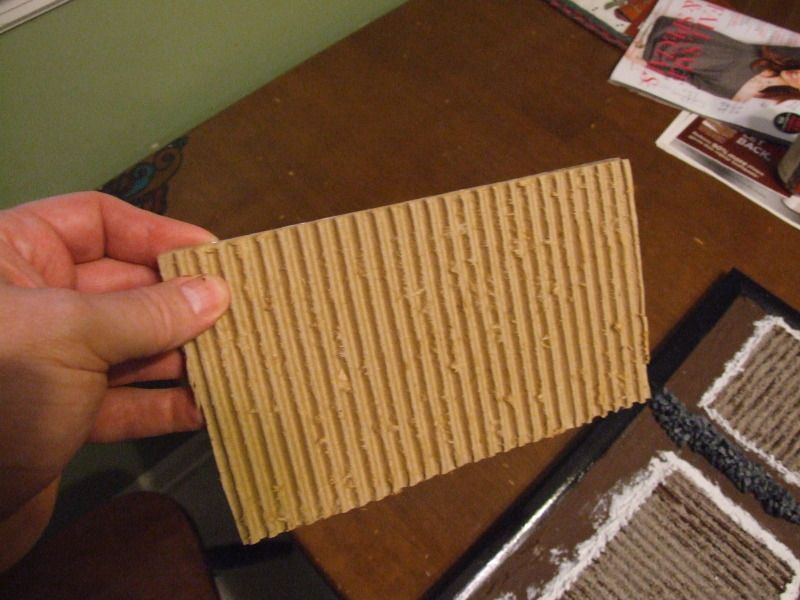
- Peel off the nasty little pieces of cardboard that like to stay stuck and make it look as clean as possible.
- Paint BOTH sides of the card board with acrylic paint. It is important to do both sides. This will minimize any warping the cardboard will do as the paint dries.
Step 8 Plow the fields
- The plain cardboard is a little too smooth and doesn't look like dirt
- Spread a thin coat of PVA glue across the cardboard.
- Sprinkle the Ballast on the fields. You could use Pumice, but the Ballast is mucgh cheaper.
- Shake off the excess
- Now we have the dirty texture to look like loose earth
- After the glue dries, glue the cardboard pieces into place with Elmer's (PVA) glue.
- Use pumice to blend the cardboard into the rest of the board and go around all the edges taking special care to cover up the "tunnels" where each row opens up.
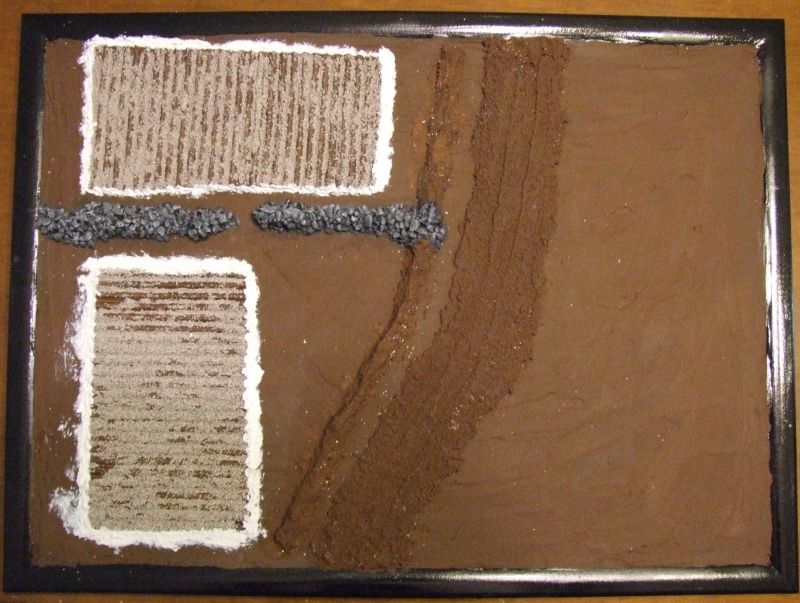
Step 9 Add Color.
- Use your craft paint and paint the ground, road and fields using whatever color scheme you want
- Start with Americana Dark Chocolate
- Then I used a black wash to add depth
- Finally, I used Americana Sable Brown as a highlight and Vallejo USA Tan Earth as a "Super Highlight."
Step 10 Get the Flock outta here....
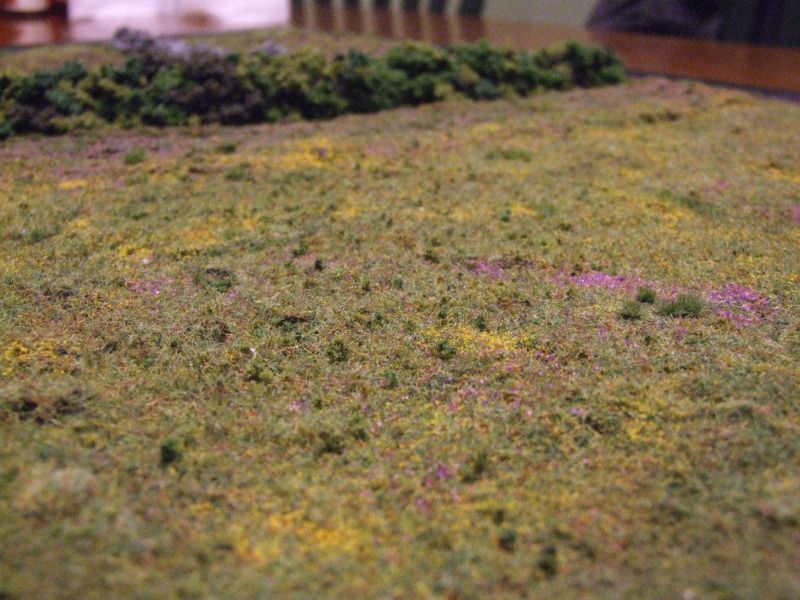
- Add your flock to where ever you want grassy fields. I used my 3 level flock process (Soil, Turf, Grass).
- Doing this now, allows you shake off excess without getting flock all mixed up on your walls and hedges (I had built my wall prior and had some cleanup to do taking flock off of the rocks)
- Seal each layer with matte medium
- I also wanted to try out some flowers in the open field and used the Woodland Scenics Flowers. This looks like Steel Wool with colored specks on it. You are supposed to pull it and spread it out on the board. It just didn't look right doing it that way. The "specks" flake off very easy in the bag the flowers come in. I ended up collecting as much of the specks as I could (helping the process where I could by knocking off as much as possible) and then just sprinkled the flowers where I thought they would be....along the hedges and road and in patches in the meadow.
Step 11 I wanna rock!!!!
- Add PVA glue over the Spackle mound base where the wall is. Put it on rather heavy, but not to the point where it is running over the surrounding area.
- Build the wall by add the rocks over the glue.
- When the glue has dry add more Matte medium to seal the in place.
- When the Matte medium is dry, paint them. I used American Lamp Black (Ebony) as a base, then American Neutral Gray, a heavy black wash, followed by a mix of the American Neutral Grey and Vallejo 989 Sky Grey and finally the 989 Sky Grey by itself.
- Apply varnish (Gloss and then matte) with a brush; being careful not to drip on the flocked surface.
Step 12 Bring us…a Shrubbery!
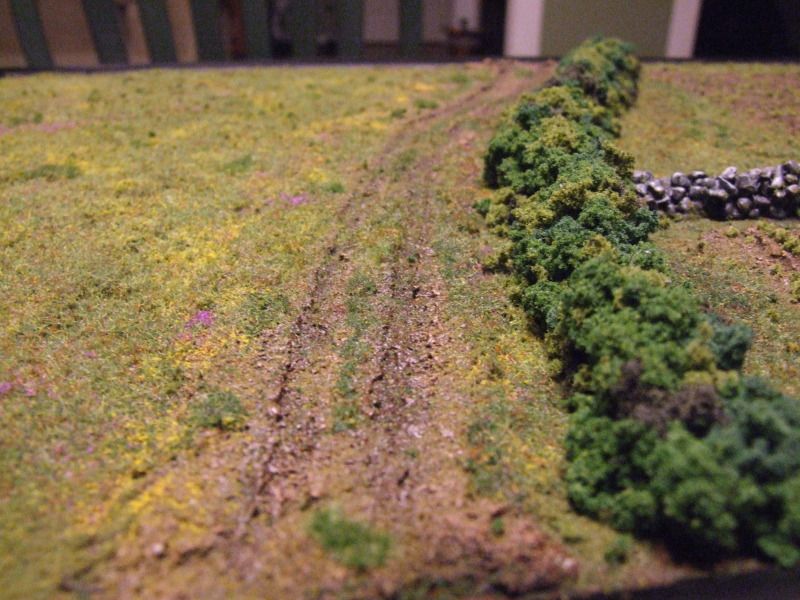
- Ni...Ni...NiNi Ni
- Now is the time for the Hot Glue Gun. Get a little bowl or dish and pour out a mix of the 3 clump foliage colors (Light/Medium/Dark Green).
- Break the clumps down into pieces no bigger than you thumbnail.
- Apply a bead of hot glue about 2-3" long along the outer bottom of the Hedge base
- Pick some clump foliage from your mix at random and apply to the glue. Press the clumps into the glue and hold for a few seconds. You need to be quick and apply the foliage before the glue dries, and careful enough not to burn yourself.
- Continue with the glue and foliage along on base and when you reach the end repeat the process on the other side of the hedge at the base.
- When both sides have been completed; repeat the process on the top.
- If you have any gaps in coverage...plug them. If you use the Hot Glue Gun be careful of creating "strings/webs." I used PVA glue to plug the few holes I had with clump foliage…didn’t want to risk hot glue “strings” getting over the surrounding clumps.
- Once all the glue is dry, SOAK and I mean SOAK all the clump foliage with Matte Medium. When dry it will protect the foliage from flaking off.
Step 13 Plant Your Field
- 2 ways to plant your crops.
- Fuller mature veggies (like in the picture above)
- Take scrap pieces of your clump foliage or coarse flock and glue to the top of each row in a checkerboard fashion
- Very time consuming but gives a nice look of a lettuce or broccoli patch
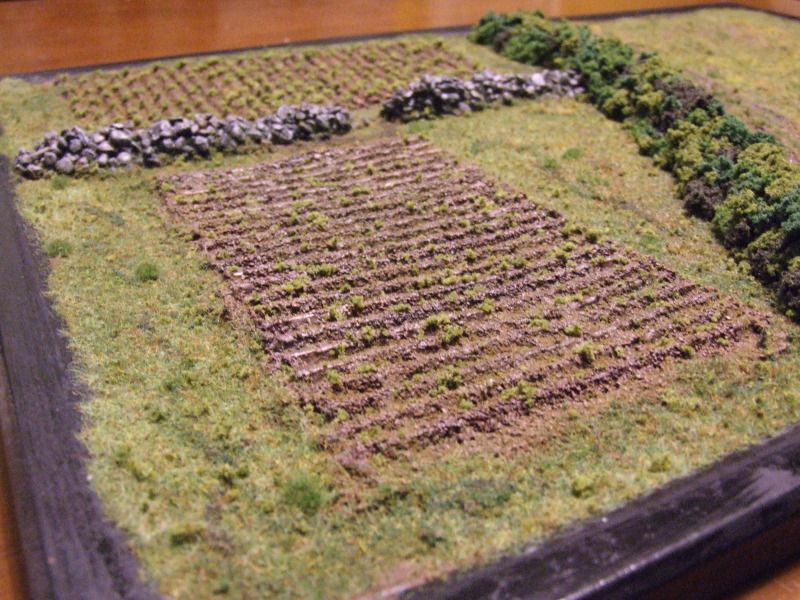
- For crops just coming out of the ground (above)
- Glue random dots of PVA glue on the tops of the rows
- Sprinkle scraps of clump foliage or coarse flock over the piece
- Press everything down. You can use your hand or a scrap piece of cardboard to assist
- When dry, shake of excess, clean out the valleys of any flock and trim any excess off with scissors
- This is a little quicker, but gives a very haphazard look.
- Apply a coat of Matte MEdium making sure the veggies get good and wet.
There you go.
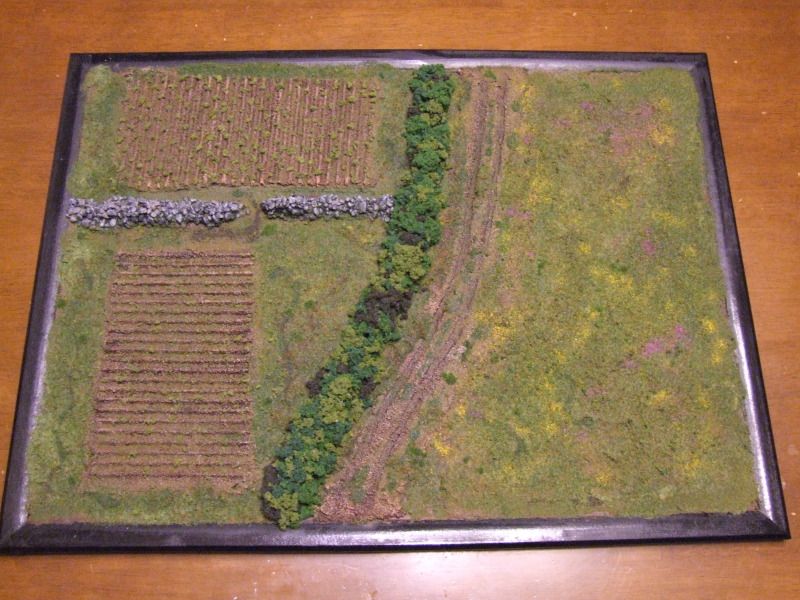
The board looked great...did great at the tournament and helped me and my partner get the highest Best Painted Army scores. In total, it took about a week...working on it off and on for about 30-60 minutes a shot each day. Honest Luke and Steve…it was only during times something was drying on the commission jobs I am doing for you :-). The best part is that out of pocket costs were roughly $25 I used a lot of items I had laying around for the basing of my miniatures anyways (flock, foliage, Pumice, paint, etc...). The biggest cost items where the bulletin board itself, the Matte Medium, and the Spackle.
I am trying to fiddle with the board and figure how I can best add some storage underneath. This way I can have my rulebook and Army list and templates all right at hand and don’t have to have them scattered around (or heaven forbid on the actual game table!). I have a few ideas…just have to play with how to strengthen the board in the middle.
More to follow as it develops!
Have you made a display board...do you use them? As Ferris Bueller said "It is so choice. If you have the means, I highly recommend picking one up."
Wednesday, September 26, 2012
German Stuka
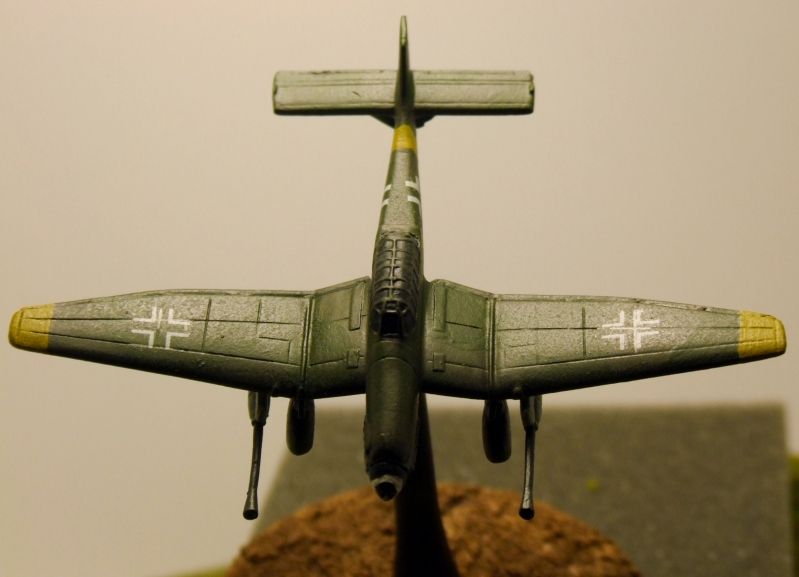
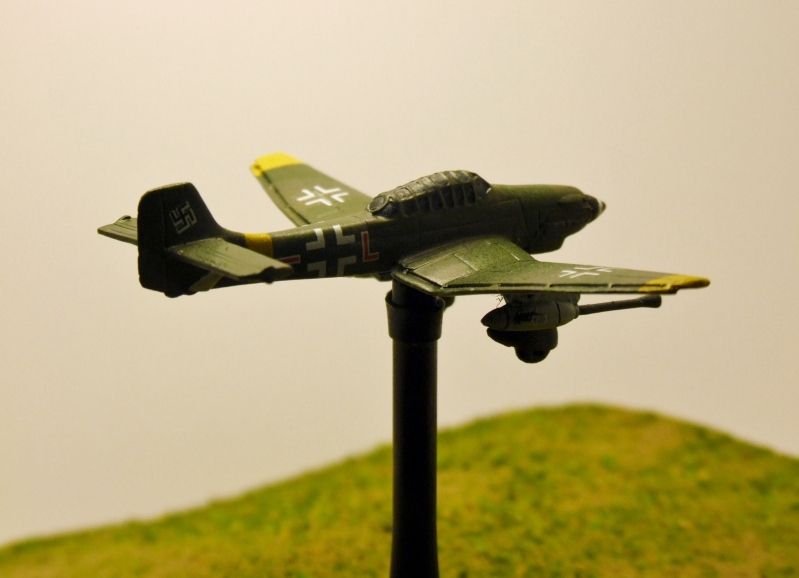
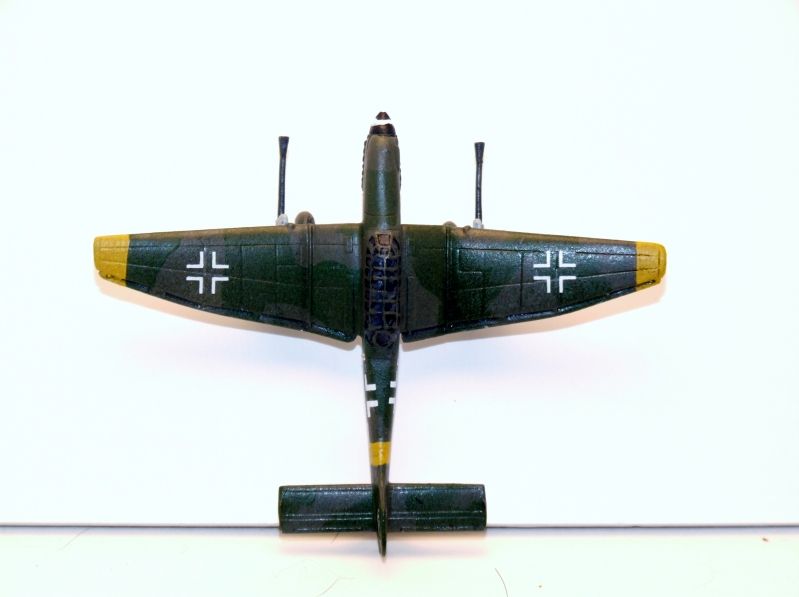
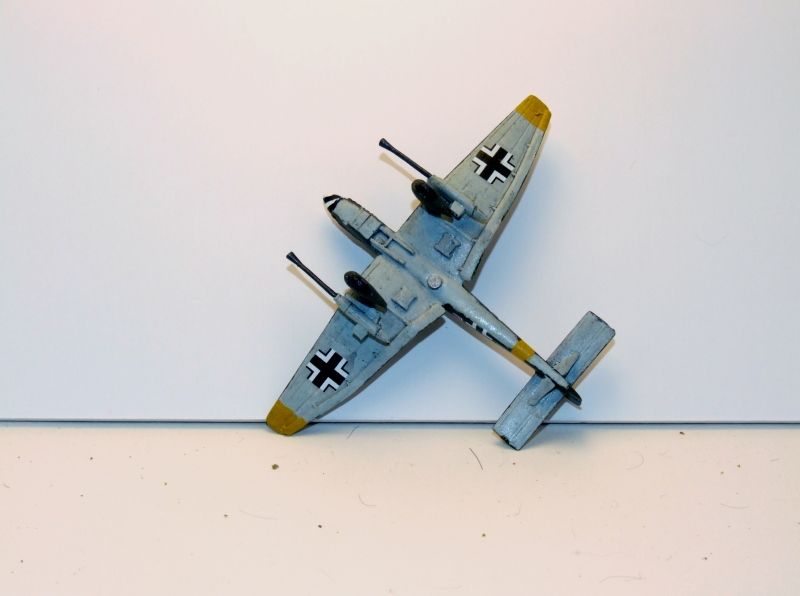
The last of the 3 planes I recently completed was the workhorse of German Close Air Support-----The Stuka.
I got this baby during the "Great Plane Swap" at WWPD where folks were selling off their "extra" 2 planes that came in a 3 pack box since the new Version 3 rules for Flames of War chnaged the rule so that now you only need one model and a die to represent the flight of up to 3 planes versus the V2 method of having a model for each plane in the flight.
This puppy is geared up for action with the wing mounted cannons and bombs...ready to make mincemeat of anything foolish to get in it's sights. MuWuhahahahahahaha
This plane came to me alrready primed so the initial prep work was already for me. Remember, these planes are not easy to paint. The resin they are made of is VERY slick and does not hold paint well. You HAVE to make sure that you wash the model thoroughly with soapy water and then "rough" it up with super super fine sandpaper (something like 1000 grit or higher). Then you have to use a TRUE primer (not just an undercoat). You need to be careful as the detail is very shallow. Spraycan primers can go on very heavy and if you aren't careful you clog up that detail.
I used the same color scheme ...as well as some leftover decals...from the HS129B3.
830 Field Grey ------ Base top
890 Reflective Green ----- Camo Spotches Top
907 Pale Grey Blue -------Underside
950 Black --- Window Base
964 Field Blue-------- Window reflection squiggles
977 Desert Yellow ---- Base for yellow stripe and wingtips
Testors Yellow Zinc Chromate --- Yellow Stripe and wingtips
Paint Tip: Painting "Yellow" can be tricky. If you lay down a brown color first (I used 977 Desert Yellow), "Yellow" goes down much easier on top of the brown base. Other wise you will be laying down 4-5 fairly heavy coats of "Yellow" to build it up to the right shade....and each layer fills in detail.
Monday, September 17, 2012
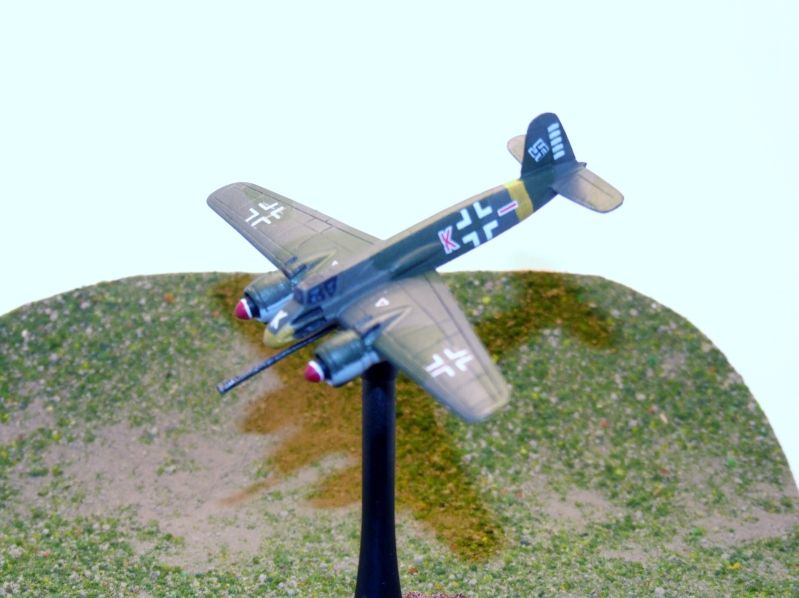
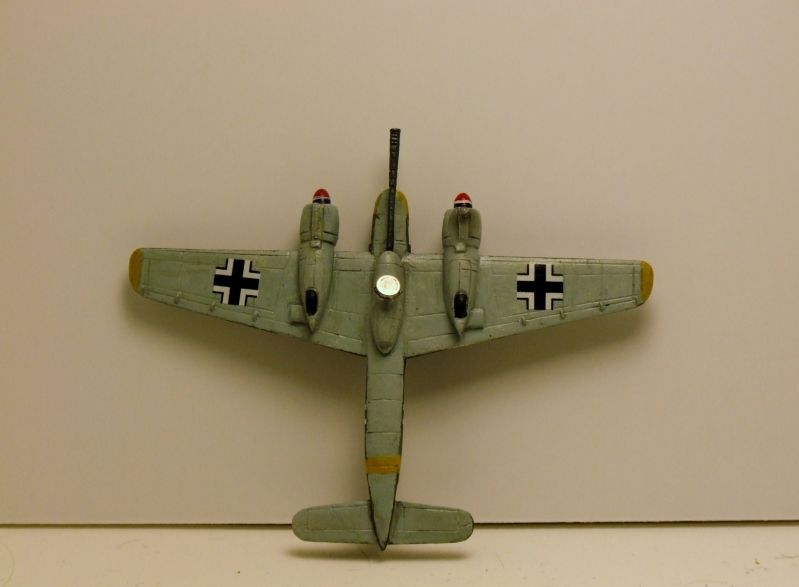
German HS-129B3
Back again with a weekly update. This time its the German HS-129B3 I was able to get done in between commissions. I love this plane. It not only looks mean, but it can a mess of enemy armor into squashed tin cans. It mounts a 75mm autocannon of all things....going against side armor? YIKES!
This bad boy is perfect for my East Front armies.
Again, these planes are still not easy to paint. The resin they are made of is VERY slick and does not hold paint well. You HAVE to make sure that you wash the model thoroughly with soapy water and then "rough" it up with super super fine sandpaper (something like 1000 grit or higher). Then you have to use a TRUE primer (not just an undercoat). You need to be careful as the detail is very shallow. Spraycan primers can go on very heavy and if you aren't careful you clog up that detail.
So here is what I did:
830 Field Grey ------ Base top
890 Reflective Green ----- Camo Spotches Top
907 Pale Grey Blue -------Underside
950 Black --- Window Base
964 Field Blue-------- Window reflection squiggles
977 Desert Yellow ---- Base for yellow stripe and nose
Testors Yellow Zinc Chromate --- Yellow Stripe and Nose
Paint Tip: Painting "Yellow" can be tricky. If you lay down a brown color (I used 977 Desert Yellow), "Yellow" goes down much easier. Other wise you will be laying down 4-5 fairly heavy coats of "Yellow" to build it up to the right shade....and each layer fills in detail.
Decals are those supplied in the Battlefront box. The side decals gave me A LOT of trouble They are long and kept wanting to curl up on me....One set actually broke apart into 4 pieces on me. Luckily you have 3 sets of decals on the one transfer sheet....a hold over from when planes came 3 to a box.
As with the Hurricane IIC, I hand brushed the entire model. Did a gloss coat when finished and did 3 layers of a light pin wash to bring out the panel lines. Then hit it with a flat matte finish to kill the shine.
Monday, September 10, 2012
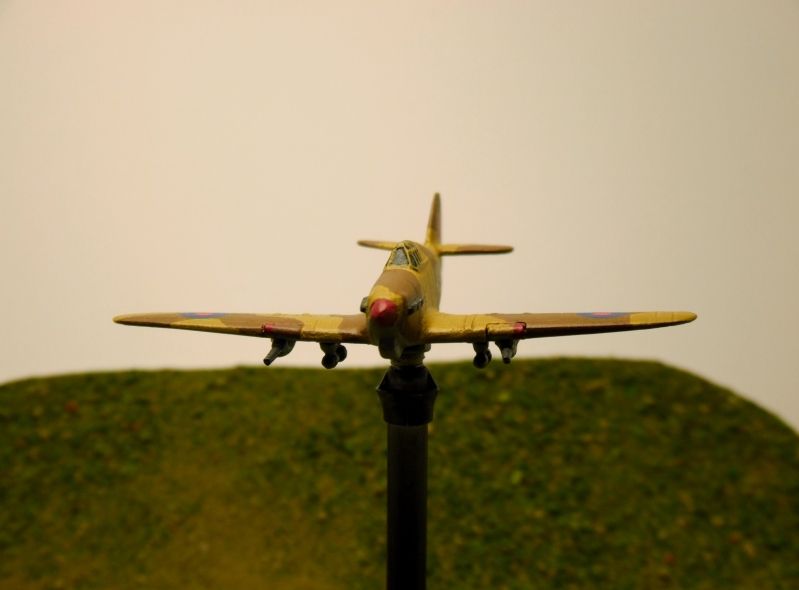
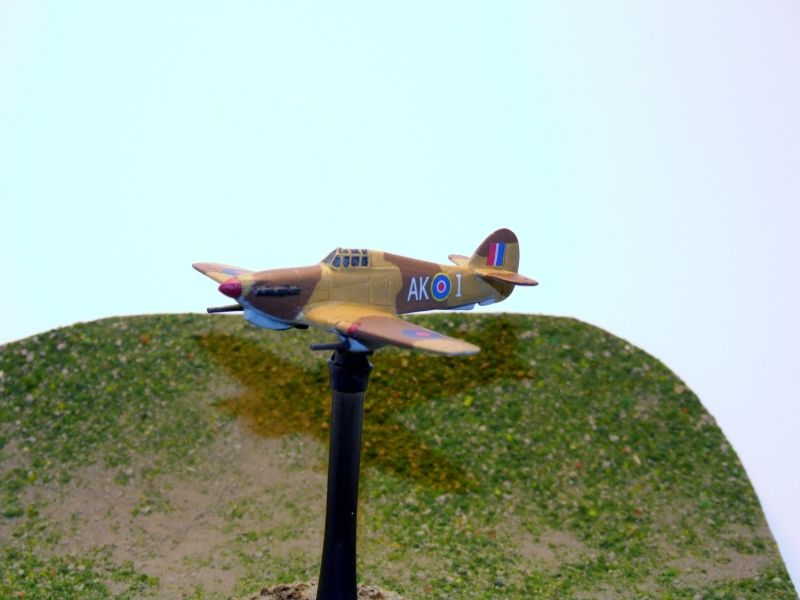
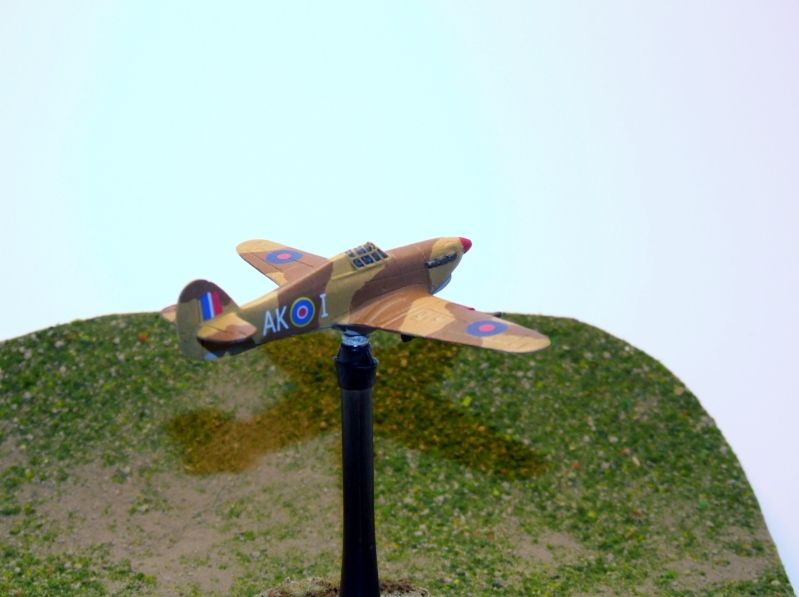
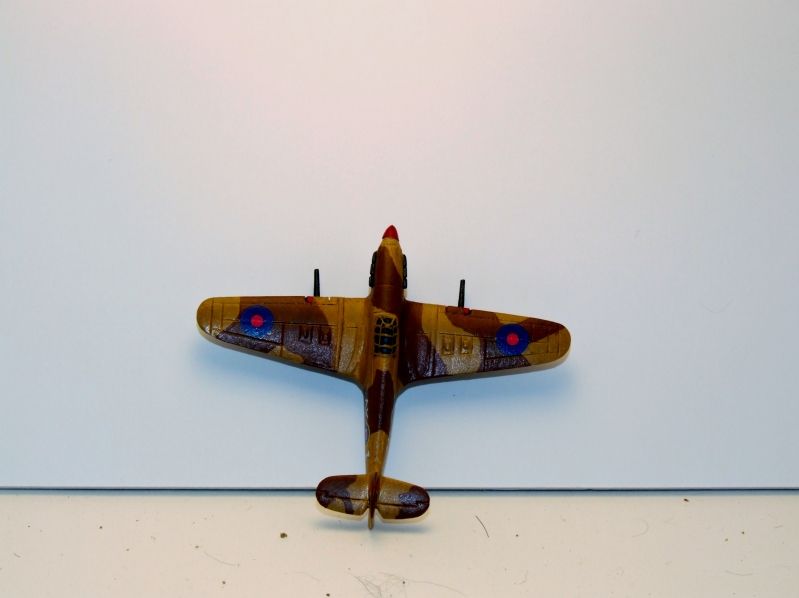
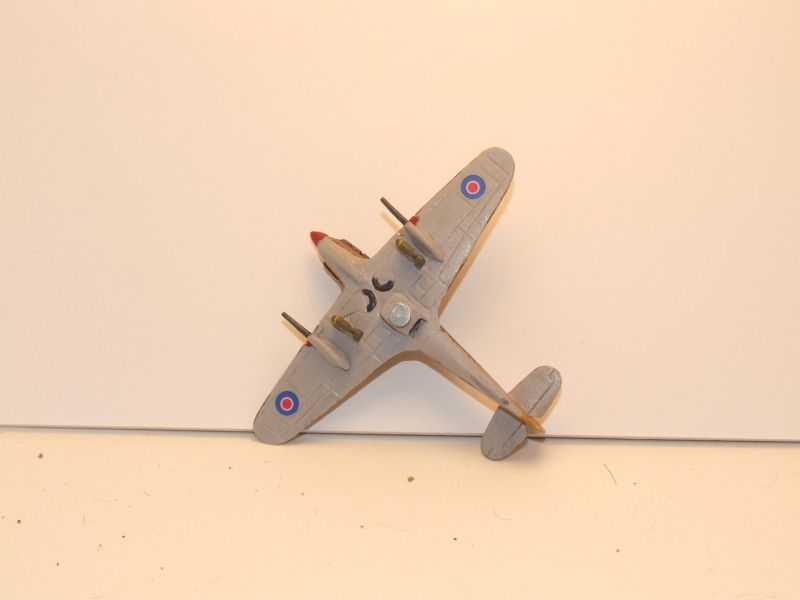
British Hurricane IIc
Greetings all! Its been a while since I posted some pics of my stuff...but Fear Not!!! I have not stopped painting, just been focusing on some commission pieces that have taken priority over my stuff, and the folks I am doing the work for will be posting MUCH better pics than I do. When they post I will link to their site. Those jobs have been...and still are some interesting pieces.
So, while I have been waiting for stuff to dry on the commission pieces, I was able to knock out some aircraft. The first I did is for a Mid-War Team tournament where I am running about 1000 points of Brit paras in Italy from the North Africa book. Here I can get a Hurricane IIc...and I just had to . Its ALMOST as good as the Typhoon I get for my Arnhem paras.
These planes are still a pain to paint. The resin they are made of is VERY slick and does not hold paint well at all. First tip is to wash the model thoroughly with soapy water and then "rough" it up with super super fine sandpaper (something like 1000 grit or higher).
My color Scheme:
914 Green Ochre ---- Base color
824 German Camo Orange Ochre ----- 1:8 Wash (paint to water)
989 Sky Grey ---- Underside
875 Beige Brown ---- Camo Splotches
984 Flat Brown ---- Base for Little Red dots by the Cannon and the Nose
957 Flat Red ---- Little dots by the Cannon and the Nose
950 Black ---- Window Base
964 Field Blue ---- Window reflection squiggles
Decals are those supplied in the Battlefront box.
I hand brushed the entire model. Did a glos coat when finished and did 3 layers of a light pin wash to bring out the panel lines.
This should bring some pain in our tournament as it is Limited Air...with 5 dice instead of the Sporadic Air with 3 dice I get with the Typhoon in my Late War list Mwuwahahahahahaha.
Sunday, August 19, 2012
Malifaux (I know, right?)
Well....I got hooked.
My FLGS (The Foundry in Huntsville, Alabama) had a mini tournament this weekend....but lets rewind a bit for the full story.
During the Flames of War Tournament last month I organized last month I was talking with Bethany (Store Owners wife and Malifaux aficionado) while the games were going. She mentioned that there was a mini tournament that was noob friendly and that I should come out and play.
I had always viewed Malifaux as that "Wierd" game (It is a Wyrd game since they are the publishers of it) with really cool models. I have a passing interest in Steam Punk....but Bethany's enthusiasm was infectious and she spurred by interest so that the next week I borrowed a rulebook (Big mistake I know!!!!!!) Add to that the store has made some cool terrain for the game...first off is thier village board:
Well... I got hooked on the fluff and the weirdness (or wyrdness) of the game made since. The game blends steam punk with daemons with zombies with goblins with cowboys....and soon with martial artists! The mechanics are really slick. No dice...random actions are determined by a deck of cards and deck manipulation is a big part of the game. Each model is a character with special abilities and triggers based on the card suites. Every faction and crew has a very distinct flavor and character. I have to say it was a lot of fun.
Fast forward to this weekend...the Mini tournament. I learned a lot about running a tournament. Tera (The lead organizer) and Bethany did a great job. The prizes were themed and very slick. There were 3 "qualifying rounds" and the top four of those went to the semi finals and the top two would play a final match on a new board (sewer board) made just for the tournament. The games played also went to Wyrd's Dead Heat campaign.
Well, suffice to say I was nervous. This was my first tournament playing since 1990 (Yes I am an old fart). I ran the Perdita Ortega crew...a cowboy themed crew with a hot chick leading her family. Lots of shootie goodness.
My first game was against Alex and a Seamus crew (Think undead pimp and hooker zombies). Great opponent and surprise surprise...I won. It boiled down to an initiative flip. Who one that flip would get first action and have the first chance to win...I got the initiative and won my attack.
My Second game was against Angel...she ran a Victoria's crew. Think steam punk street gang lead by twin girls with swords...but are they REALLY twins? She was a lot of fun to play against and it was another close one. Malifaux is all about your missions...not necessarily killing the other crew. This mission was "Destroy the Evidence" where there are 3 objectives on my side that she has to destroy, 3 on her side for me and one in the middle for both of us. she got the middle on and the 2 closest in my side REAL quick and I thought that was it. But we still had 4 turns for sure (game ends at 6 turns unless the last person moving wants to go longer and flips a high card each turn thereafter). My shootie crew started and I got some really good damage flips and cleared out enough of her crew so my guys could make a break for the objectives. I got the overall mission (Strategy) and my 2 side missions (Schemes)...I won again.
My third mission was against Will who ran the same crew as Angel. Hers was a quick and agile force, his was a beefy smash in your face version. He was great player and am still reeling over the beating. but get this....We are tied for third place...and we both advance to the semi finals.
Next game was versus Mike who ran Perdita as well. Great opponent and I learned a lot from him...special thanks to him for taking time to teach along the way. Our mission was "Deliver the Message" where one of your characters has to be adjacent to the other team's leader for a full turn. It boiled down to we killed everything off except our leaders and they weren't going near the other one, but he was able to get one of his secondary missions (Called Schemes) and he went on to the finals.
At this point final totals were tallied and Angel won best theme (She also dressed up to match her crew), I got best Sportsman and cool themed leather ledger (had to say that)...and for third place it went to...what? Will and I are STILL tied?!?!?!? Well, first tie break was total victory points...we were still tied! But, Will came ahead on the second tie break of head to head since he beat me in the qualifying round. So, he got third and I came in a respectable 4th.
I had to leave after that and didn't get to watch Adrien (Store Owner and overall Game God) take on Mike. But it was 2 Guild crews facing off....Mike's Perdita crew versus Adrien's Sonia crew (Think fire magic user and witch hunter). I heard that Adrien was able to come out ahead in the game and take first place. Guild wins!
So, I am hooked. It is a great game. Easy to get into as well with a low model count for games. A Crew Starter box is roughly $35 on average and is what we played in the tournie for the most part...extra models are about $10 a blister. Great community too....so I see myself playing some more for sure.
My FLGS (The Foundry in Huntsville, Alabama) had a mini tournament this weekend....but lets rewind a bit for the full story.
During the Flames of War Tournament last month I organized last month I was talking with Bethany (Store Owners wife and Malifaux aficionado) while the games were going. She mentioned that there was a mini tournament that was noob friendly and that I should come out and play.
I had always viewed Malifaux as that "Wierd" game (It is a Wyrd game since they are the publishers of it) with really cool models. I have a passing interest in Steam Punk....but Bethany's enthusiasm was infectious and she spurred by interest so that the next week I borrowed a rulebook (Big mistake I know!!!!!!) Add to that the store has made some cool terrain for the game...first off is thier village board:
Well... I got hooked on the fluff and the weirdness (or wyrdness) of the game made since. The game blends steam punk with daemons with zombies with goblins with cowboys....and soon with martial artists! The mechanics are really slick. No dice...random actions are determined by a deck of cards and deck manipulation is a big part of the game. Each model is a character with special abilities and triggers based on the card suites. Every faction and crew has a very distinct flavor and character. I have to say it was a lot of fun.
Fast forward to this weekend...the Mini tournament. I learned a lot about running a tournament. Tera (The lead organizer) and Bethany did a great job. The prizes were themed and very slick. There were 3 "qualifying rounds" and the top four of those went to the semi finals and the top two would play a final match on a new board (sewer board) made just for the tournament. The games played also went to Wyrd's Dead Heat campaign.
![]() |
| Sewer Board |
Well, suffice to say I was nervous. This was my first tournament playing since 1990 (Yes I am an old fart). I ran the Perdita Ortega crew...a cowboy themed crew with a hot chick leading her family. Lots of shootie goodness.
My first game was against Alex and a Seamus crew (Think undead pimp and hooker zombies). Great opponent and surprise surprise...I won. It boiled down to an initiative flip. Who one that flip would get first action and have the first chance to win...I got the initiative and won my attack.
My Second game was against Angel...she ran a Victoria's crew. Think steam punk street gang lead by twin girls with swords...but are they REALLY twins? She was a lot of fun to play against and it was another close one. Malifaux is all about your missions...not necessarily killing the other crew. This mission was "Destroy the Evidence" where there are 3 objectives on my side that she has to destroy, 3 on her side for me and one in the middle for both of us. she got the middle on and the 2 closest in my side REAL quick and I thought that was it. But we still had 4 turns for sure (game ends at 6 turns unless the last person moving wants to go longer and flips a high card each turn thereafter). My shootie crew started and I got some really good damage flips and cleared out enough of her crew so my guys could make a break for the objectives. I got the overall mission (Strategy) and my 2 side missions (Schemes)...I won again.
My third mission was against Will who ran the same crew as Angel. Hers was a quick and agile force, his was a beefy smash in your face version. He was great player and am still reeling over the beating. but get this....We are tied for third place...and we both advance to the semi finals.
Next game was versus Mike who ran Perdita as well. Great opponent and I learned a lot from him...special thanks to him for taking time to teach along the way. Our mission was "Deliver the Message" where one of your characters has to be adjacent to the other team's leader for a full turn. It boiled down to we killed everything off except our leaders and they weren't going near the other one, but he was able to get one of his secondary missions (Called Schemes) and he went on to the finals.
At this point final totals were tallied and Angel won best theme (She also dressed up to match her crew), I got best Sportsman and cool themed leather ledger (had to say that)...and for third place it went to...what? Will and I are STILL tied?!?!?!? Well, first tie break was total victory points...we were still tied! But, Will came ahead on the second tie break of head to head since he beat me in the qualifying round. So, he got third and I came in a respectable 4th.
I had to leave after that and didn't get to watch Adrien (Store Owner and overall Game God) take on Mike. But it was 2 Guild crews facing off....Mike's Perdita crew versus Adrien's Sonia crew (Think fire magic user and witch hunter). I heard that Adrien was able to come out ahead in the game and take first place. Guild wins!
So, I am hooked. It is a great game. Easy to get into as well with a low model count for games. A Crew Starter box is roughly $35 on average and is what we played in the tournie for the most part...extra models are about $10 a blister. Great community too....so I see myself playing some more for sure.
Thursday, August 9, 2012
WWPD Articles and Status
Just wanted to share a few of the recent articles I have done for WWPD in case you aren't a regular viewer at WWPD (which I recommend you do daily as they always have good articles).
These articles are reviews of the models used in the Raiding Aces campaign he held at our FLGS here in Huntsville Alabama. For the articles so far we covered the forces that I played (the Autosahariana), that Adrien played (he LRDG) and that John played (the SAS). The models shown were painted by the people that played them (except the SAS, I painted those). The articles also include some tips for playing those forces. So far the articles done are:
Autosahariana AS42 Article
LRDG Article
SAS Article
I plan to do at least one more on the raiders...the OSS that Michael ran. That should be up in a few weeks. That is a cool force among other cool forces.
Other than that I am knee deep in the commission for Luke from WWPD and am swimming in US Infantry and Armored Rifles. Working through that and have already sent him back 2 Armored Rifle Platoons with all the fixings as well as seated GIBs (Guys in Back) in the halftracks. Luke is going to make a post on WWPD when he gets them all based (he is basing them them himself to keep a common theme across his forces....remember an earlier post I had on that? :-) ).
Oh well back to the grindstone! As long as I dont get sidetracked by any.......ooooHHHHH? what's that? Malifaux? That's that wierd game right....but the models are so pretty.....prettyprettypretty
GRRrrrrrrr!!!!!!
These articles are reviews of the models used in the Raiding Aces campaign he held at our FLGS here in Huntsville Alabama. For the articles so far we covered the forces that I played (the Autosahariana), that Adrien played (he LRDG) and that John played (the SAS). The models shown were painted by the people that played them (except the SAS, I painted those). The articles also include some tips for playing those forces. So far the articles done are:
Autosahariana AS42 Article
LRDG Article
SAS Article
I plan to do at least one more on the raiders...the OSS that Michael ran. That should be up in a few weeks. That is a cool force among other cool forces.
Other than that I am knee deep in the commission for Luke from WWPD and am swimming in US Infantry and Armored Rifles. Working through that and have already sent him back 2 Armored Rifle Platoons with all the fixings as well as seated GIBs (Guys in Back) in the halftracks. Luke is going to make a post on WWPD when he gets them all based (he is basing them them himself to keep a common theme across his forces....remember an earlier post I had on that? :-) ).
Oh well back to the grindstone! As long as I dont get sidetracked by any.......ooooHHHHH? what's that? Malifaux? That's that wierd game right....but the models are so pretty.....prettyprettypretty
GRRrrrrrrr!!!!!!
Thursday, August 2, 2012
Tournament Results
The Foundry Firefight was held the last weekend in July and a lot of fun was had by all.
The Firefight was a 3 round, 1750 point, Late War, Flames of War tournament held at The Foundry in Huntsville, Alabama.
Format:
- Forces were restricted to any list from an official Flames of War Late War Version 3 compatible source (book or PDF). Force could not exceed 1750 points.
- 3 rounds (1st round Mobile Battle, 2nd round Defensive Battle, 3rd round Fair Fight). Players decided mission or rolled for mission from those available for that round if they could not come to terms.
- Round lengths were 2.5 hours with 30 minutes between rounds
- Initial pairings were be based upon player’s estimated strengths while trying to keep as many matches Red vs Blue as possible. Remaining rounds pairings were based upon player tournament standings.
- Matches were randomly assigned to a table.
- Tables consisted of a variety of terrain (urban, desert, wadi, village, light forest, streams, hills, etc…). The Tables used:
- Forces were restricted to any list from an official Flames of War Late War Version 3 compatible source (book or PDF). Force could not exceed 1750 points.
- 3 rounds (1st round Mobile Battle, 2nd round Defensive Battle, 3rd round Fair Fight). Players decided mission or rolled for mission from those available for that round if they could not come to terms.
- Round lengths were 2.5 hours with 30 minutes between rounds
- Initial pairings were be based upon player’s estimated strengths while trying to keep as many matches Red vs Blue as possible. Remaining rounds pairings were based upon player tournament standings.
- Matches were randomly assigned to a table.
- Tables consisted of a variety of terrain (urban, desert, wadi, village, light forest, streams, hills, etc…). The Tables used:
Rules clarifications were announced early. Specifically, we used the following
clarifications:
-
“Ambushing Pioneer Supply Vehicles (PSV):”
PSVs that are in ambush reveal their obstacles when the unit is declared
to be in ambush.
- It was preferred that aircraft be on the “new” Battlefront standard oval aircraft bases. In the event aircraft were not, we measured to a spot 2.5 inches up from the table to determine the aircraft’s location.
- Hills. Several tables had “sculpted” hills. These tables were identified as such and “hulldown” status is earned from true line of sight. On tables with “flat topped” hills, players claimed hull down concealment if the hull was just behind where the crest of the hill would be if it were not a flat game hill. The crest was defined as an imaginary line running along the center of the hill.
- Terrain types for each board were identified with a handout at each table
Well, no plan survives first contact…and this was no exception. We had expected several out-of-towners to attend, but alas they did not show. So, we were down to the core of our local players.
| Steve Toth's Hungarians |
| Michael Raper's US Tanks |
| Mark Kilness' Panzer Grenadiers |
| Paul Applebaum's British Guards Infantry |
Results:
Round
1:
Steve vs Michael: Hasty Attack Steve was the victor 4-3
Mark vs Paul: Hasty Attack Mark was the victor 6-1
Round 2:
Steve vs Paul: Pincer Steve was the victor 4-3
Round 3:
Steve vs Michael: Dust-up Steve was the victor 4-3
Mark vs Paul: Dust-up Mark was the victor 4-3
Final Standings:
R1 R2 R3 F
Steve 4 4 4 12
Michael 3 6 3 12
Mark 6 1 4 11
Paul 1 3 3 7
Tie breaker was the painting competition that was held during the lunch break. The judge was Clay Williams of The Foundry. Clay is a Gold Daemon Award Finalist and has judged numerous other painting competitions to include several Games Workshop Grand Tournaments.
Paint Competition:
1st: Steve Toth
Michael 3 6 3 12
Mark 6 1 4 11
Paul 1 3 3 7
Tie breaker was the painting competition that was held during the lunch break. The judge was Clay Williams of The Foundry. Clay is a Gold Daemon Award Finalist and has judged numerous other painting competitions to include several Games Workshop Grand Tournaments.
Paint Competition:
1st: Steve Toth
2nd: Michael Raper
3rd: Paul Applebaum
4th: Mark Kilness
Final Standings:
Final Standings:
Using the Painting Competition as a tiebreaker, Steve Toth was the Overall winner with Michael Raper coming in second. Their games were close blood baths and it was only fitting that it fell out the way it did. Great job done by all the players…The Foundry’s staff…and The Foundry’s other patrons putting up with us. Thanks to all of you.
Lessons Learned:
- Advertise…Advertise…Advertise… You need to do more than word of mouth. You need to call other game stores…visit other groups.
- Strike up relationships with the people and groups you advertise with. If you travel to their tournaments and visit them….they will be more much more inclined to do the same and visit you…and attend your tournament.
- Timing. Start advertising at LEAST 3 months in advance and keep in touch with the places/people you are advertising with. This will really help give people time to make plans, especially if they are out of town. Follow up is also key…don’t want them to forget!
- If you have the tournament in your FLGS, make sure other patrons know in advance that you will have a tournament and gaming space will be limited. The store had several disappointed players of other systems show up to see that we had occupied the gaming areas they wanted to use…at least for a few hours until we opened some up to them.
- Be flexible. We had 9 tables set up, based on initial estimates, but ended up only using 2 tables per round. So, we opened up 3 of the tables part way into the first round and then opened up the tables we just played on as each round ended. This allowed the other patrons of the store to get there game on….and helps you maintain that positive relationship with the store.
- Rules knowledge. This is one area I was really worried about. I felt at first that I needed to be a walking encyclopedia of Flames of War knowledge. You can’t know it ALL. You need to have the basics down. Be familiar with the current hotnesses (Ambushing Pioneer Supply Vehicles for instance)…but know where you can get the info quickly should you need it. I was asked maybe 2 questions for the whole tournie…the players did a great job handling things themselves.
Parting Comments:
Again. thanks to The Foundry for hosting the tournament and to the players who came. I think everyone had a good time and were challenged. Taking the lessons learned, I think the next time I do this it will be even better.
Subscribe to:
Posts (Atom)

.jpg)